Smart Business-Time Scheduling
Overview
This use case demonstrates how to configure Smart Business-Time Scheduling in MdlWr to handle automated tasks—such as payroll processing—that must run on specific calendar dates (e.g., the 25th of every month) while intelligently adjusting for weekends or public holidays to ensure operations always execute on a valid working day.
Prerequisites & Architecture Workflow
[ Scheduled Trigger ]
│ (Evaluates Date: 25th of Month at 11:00 PM)
▼
[ MdlWr ] ──(1. Checks Business Calendar & Time Segments)
│
├──(2. Applies Exception Policy)
│      ├── Shifts to Preceding Business Day if Weekend/Holiday
│      └── Skips Non-Working Days Automatically
│
▼
[ Target API / Flow ] (Payload Executed on Valid Working Day)
Follow the step-by-step implementation guide below to configure this smart schedule within the platform.
Step-by-Step Implementation Guide
Step 1: Establish Business Time & Working Days
Before configuring the trigger, set up the base working calendar structure to define valid operational hours and non-working days:
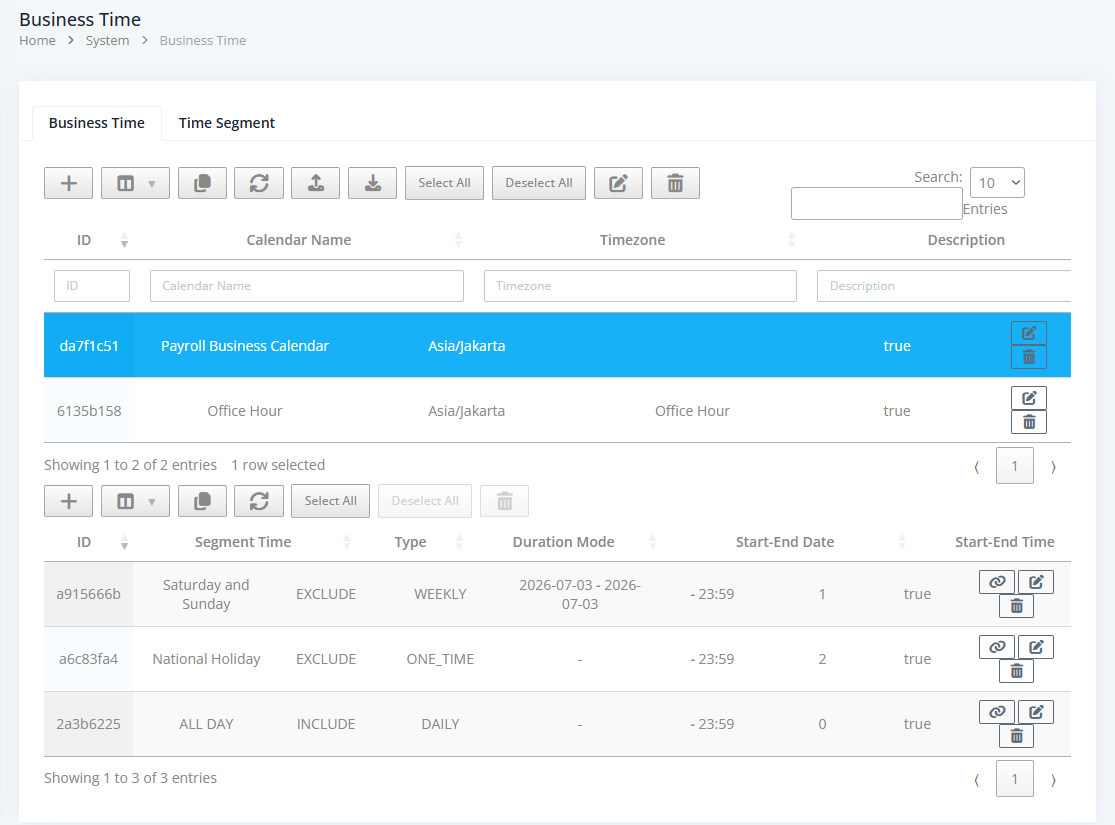
- Create Working Days Time Segment: Define standard operational availability.
- Include All-Day Segment: Set an
INCLUDErule for All Day coverage to establish general availability. - Exclude Weekends: Add an
EXCLUDErule for Saturday and Sunday (All Day) to filter out standard non-working days. - Exclude Holidays: Add an
EXCLUDErule for specific dates or national holidays. - Assign Priority: Relate the time segments to your business calendar, giving the
INCLUDEsegment the lowest priority so exclusion rules (weekends and holidays) correctly override standard availability.
Step 2: Configure Processing & Execution Modes in Logic Flow
Set up the automation rule to target your specific execution date and time.
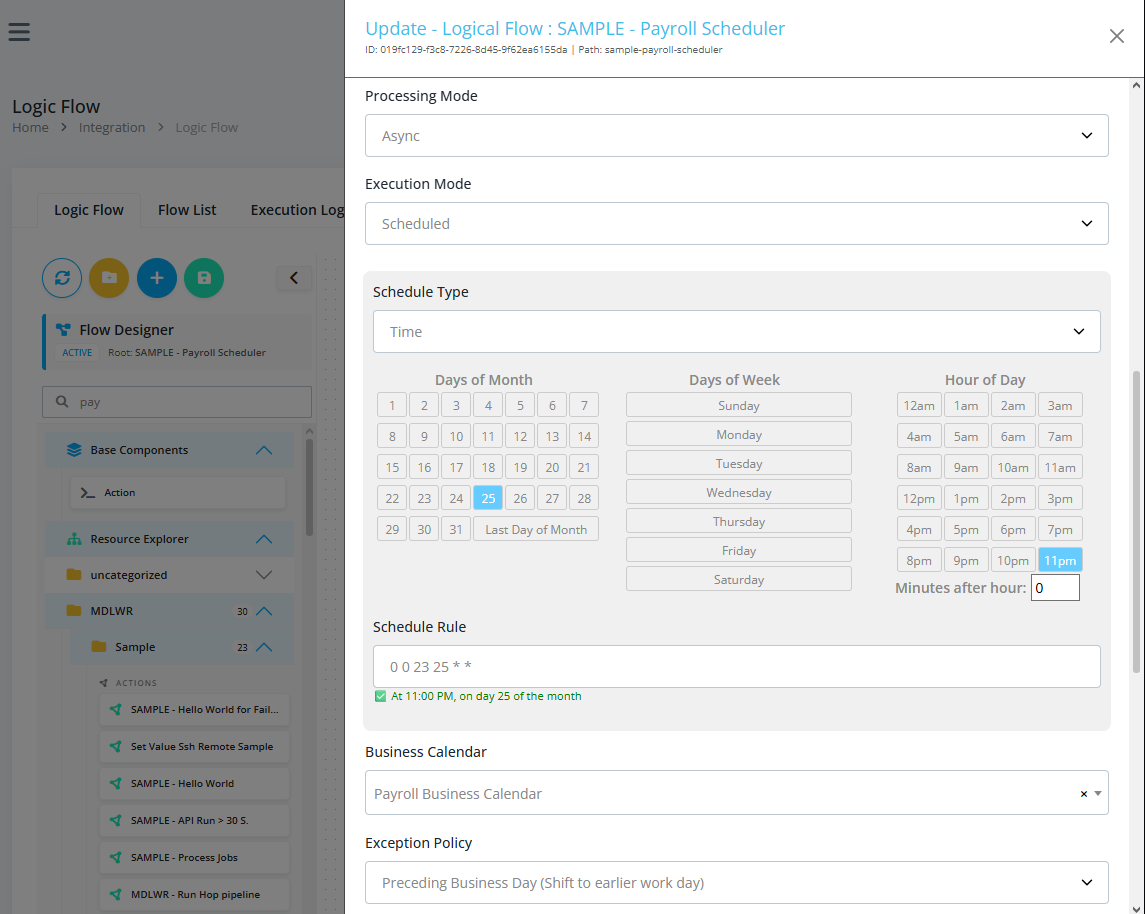
- Navigate to Integration > Logic Flows.
- Create logic flow via the (+) button.
- Set Processing Mode to
Async. - Set Execution Mode to
Scheduled. - Under the schedule rule selector, set Schedule Type to
Time. - Configure the date/time selector to target the 25th day of the month at 11:00 PM.
Step 3: Bind the Business Calendar & Exception Policy
Configure how the system handles schedule clashes when the target date falls on a non-working day.
- Locate the Business Calendar dropdown which appears under the schedule rule settings.
- Select your pre-configured business calendar (e.g.,
Office Hour) from the dropdown options. - Locate the Exception Policy dropdown.
- Select Preceding Business Day (Shift to earlier work day) . This ensures that if the 25th falls on a Saturday, Sunday, or holiday, the system automatically shifts execution backward to the closest preceding working day.
Step 4: Validate via Schedule Preview
Verify that your calendar rules and exception policies evaluate correctly before saving.
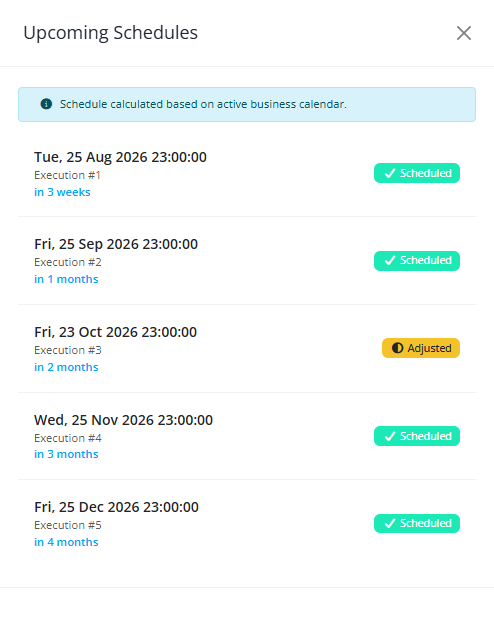
- Click the button located in the footer.
- Review the generated upcoming schedule list in the modal popup to ensure future trigger dates correctly skip or shift around weekends and holidays.
Step 5: Finalize and Link Target API
Complete the flow configuration by linking your target process and saving the record.
- Check the Active option to enable the schedule upon submission.
- Fill in remaining metadata such as Name, Path, and Category.
- Link your target API integration endpoint (e.g., routing to
MDLWR > Sample > Sample - Hello Worldor your custom processing script via the action editor). - Click Submit to save the scheduled smart flow configuration.